Course manual: Method: Build up a variety of surfaces using whatever comes to hand that has two differently coloured layers. Make several drawings by scratching through into the second layer. You can use wax and acrylic paint, oil glazes on board, household paint on wood, varnish on metal. Vary the scale of the drawings depending on your support. Choose a subject from your sketchbook or learning log and push through to make complete drawings, not just squares of texture with random marks. That way you’ll really learn what the materials can do.
I am on a worktrip to Rome and extend my stay a few days to visit my friend and painter Ellen Strasser in her studio in the Italian countryside.

Her studio is light and spacious and my dream.


Ellen clears a table for me to work on and I start on exercise 2.2- exploring mark-making materials.

Ellen has a treasure box full of suitable materials to scratch into the surface.

I am not staying long enough for oilpaints to dry, so I chose to work in acrylics- discovering Lukas Cryl brand that I have not tried before.


I start by exploring different marks on different colored surfaces on a cardboard box, and two different thicker glossy papers.

The result is much better scratching quickly into the still wet paper.
I have a problem with the scratching tool piercing too far into the paper and damaging it.


I will need to build up several layers of acrylics to create a solid base.A little frustrated by this discovery, I scratch into the left over paint on my metal palette, which is more successful:

This is really a fun experience. I will wash this away now, but I will look for some metal when home to try this again.
As for my subject, I am working from a photo that my friend Isa has sent me from her trip to Australia, where she is standing inside the trunk of a tree. I am fascinated by this forest, especially considering the recent tragic forest fires.
I start by an A4 sketch in pencil:

And some close ups of the figure in my pocket sketchbook:


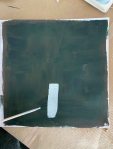
Then I prepare one of the supports with several layers of Sap green and Burnt umber Lucas Cryl. The top layer is Titanium White mixed with a little of these two colours.
I apply the top layer in small steps and scratch along the way, as the acrylics dry very fast and I can make much more free marks in the wet paint.
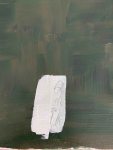

I am using very fine detailed marks and am spending a lot of time developing this into something very boring. I decide to start making larger, rougher marks. This is the whole drawing:

I am much happier with the rougher marks on forest on the sides. The detailed figure in the tree is too precious and looks like a lace curtain.
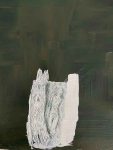
I try to add some colour:

This made it even more awful. I cover the other colours with Payne’s Grey.

I will stop here because it is just a rather awful drawing. I am happy for the mark making experiments though- this is definitely an example of many different marks:


I have found a gold paper cake tray that I am hoping will allow me to do something close to the metal palette above (if treated more carefully).
I start by covering it in Lukas Cryl Steel blue- an amazing blue tone.

I am using the drawing of Isa in the tree above and a scalpel to carefully scratch out a variety of marks.

The result here is more fun and fitting to the golden frame, but it is still not a drawing that I like.
I have also found a broken tile and try using it as a background, covering it with Titanium white with some burnt umber.

The drawing remains a little unclear here, which adds a small note of mystery that I like. I also like to hold the drawing in my hand like a precious object.
So far, I was most happy with the roughly wiped marks for the forest around the main tree. I prepare two larger new backgrounds to try out this quicker wiping and scratching- one in Steel Blue and another with the same mix of Sap green and Raw Umber as above.
Experimenting in my sketchbook, I discover the effect of a Luminescent Orange- it is really shifting things.


I start with the brown background. As before , I apply the paint piece by piece to avoid it drying before I can manipulate it.

I enjoy the larger swiping marks! Then i add structure, grass and leaves using different thickness of wooden sticks. This is the first drawing:

And the second one on Steel blue:

I like the minimalist and almost abstract character of these drawings. But then I am also curious to see how I can push it further and add paint on top that I then continue making marks in.

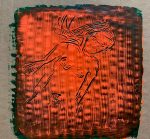
I have gone from the romantic hide away in a tree trunk to a blazing bush fire and feel that this is a much truer drawing. I feel that there is depth lacking on the right side and add a few more trees in the foreground and more marks in the ground.

For the drawing on a brown background, the bushfire develops like this:
In hindsight, I think the strongest drawings were the very simple almost abstract first versions of these drawings, especially the blue one. Pushing them further allowed me to add many layers of different marks though.

I need to change subject, and decide to turn to some portraits under water that I developed for a story about drowning, painting on glass for the parallel project. I am looking at the photos of these facial expressions under water again and continue with some mark making experiments on another of the prepared boards.

In my A5 sketchbook:

I am really fascinated by the Fluorescent Signal Red and will try it out for this subject too. It reminds me of the colour of a life west too, connecting it to the subject from another side too.
I also try out the combination of Steel blue and Fluorescent Signal Red in the A5 sketchbook:


I prepare a thicker page of A4 in Steel blue and then Fluorescent Signal Red.

The paint is pushed to the sides by my wooden stick and it almost looks like a woodcut or similar. This is the drawing I am most happy with so far. I like the expression and how the blue and orange is divided in and around the figure.
I discover that there is a Fluorescent Magenta as well, so need to try out this colour too..although the Fluorescent Signal Red carries more meaning for the subject.

I have really enjoyed working in two colours only, and also enjoyed “rediscovering” acrylics. I would like to try out this technique with oil paint or wax that dries much more slowly as well.
I have had the chance to try out many different markmaking tools, but these are the ones I used most:

It is time to pack and leave. I have absolutely loved working alongside an artist friend, although we were working on very different things, it is wonderful to share the joy of making.
3 weeks later
Only three weeks later, a joyful trip to Italy seems like from another lifetime. We are in the midst of corona virus Covid 19 measures and in a lock down here in Portugal and in most surrounding countries.
I finally manage to restart with this exercise and will try out scratching into oil paint on wood.
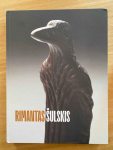
I am inspired by a book about the work of Lithuanian sculptor Rimantas Sulskis that was gifted to me recently. I am really touched by his bronze sculptures expressing the oppression under the Soviet Union through bird-men or birds and men in various intertwined forms.
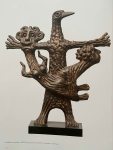
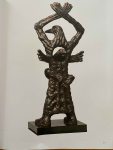
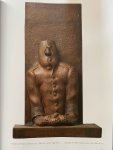
They are humorous and touching and really expressing the struggle and pain and I find them fantastic.
The same figures reappear in Sulskis monoprints and ink drawings:
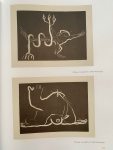

(Images from the book “Rimantas Sulskis” : (2019). Rimantas Sulskis. Lithuania: Vilniaus Dailes Akademijos Leidykla, reproduced with permission of Rimantas Sulskis estate.)
I am wondering how I can develop a drawing about the oppression of today- the Corona virus- inspired by Sulskis without copying his work too closely.
I start by drawing from the book just to familiarize myself with the figures:


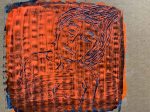
Then the idea comes to place a mask over the bird mans beak, symbolizing what is happening to the world now.


I am going to paint with oil on the lid of a wooden box:

I cut two watercolour papers to the the size of the board to try out two different compositions in Indian ink:


I choose the one on the right.
I then try out different ways of applying paint and scratching into the surface on the underside of the panel.


I see that I need to apply a coat of Transparent Gesso so that the paint does not seep into the wood. I am using a Liquitex transparent gesso. When dry, I apply a thick coat of Payne’s Grey Cobra oil paint to the wooden lid.


This is the final drawing, oil on wood:

I like how the feeling of the wooden surface comes through, and I quite like the playful, cartoon like figures that help me express a serious subject that has definitely infected my mind.
Again, this has been a project that has pushed me to explore a method of drawing that I would not consider otherwise, and I could just go on varying surfaces and media, but it is time to move on to the next project.
